IMU Realign checklist (Virtual AGC)
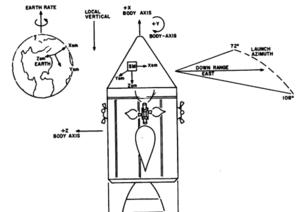
The Inertial Measurement Unit (IMU) is used to determine the CSM and LM attitude with respect to an inertial, star-fixed system. Independent from the spacecraft's manoevers the IMU platform, also called "Stable Member", is kept fixed with respect to any inertial system, especially the Apollo Basic Reference Coordinate SystemCSMGSOP. The coordinate system the IMU platform is aligned to actually can vary throughout the mission for various reasons (to avoid gimbal locks etc.)

At launch and during earth orbit insertion (and sometimes much longer) the Local Vertical Coordinate system at the pad is used, the IMU prelaunch alignment. In order to locate the earth, the moon or the stars the AGC knows the current orientation of the IMU platform with respect to the Basic Reference System by storing the Reference to Stable Member Matrix (REFSMMAT) in it's erasable memory.
The Virtual AGC program P52 is also used to check the IMU orientation. Both in reality and in Orbiter the IMU platform doesn't maintain it's attitude perfectly, but it drifts a little bit and that causes errors in the calculations of the AGC. To check and realign the IMU to its previous alignment orientation sightings on two stars in the sextant are used.
Not every star is usable for star sightings but the AGC carries a catalogue of the positions of 37 prominent stars distributed across the sky, the Apollo AGC navigation stars. The Apollo astronauts needed to know these stars and trained to find them within the celestial sphere, thanks to Orbiter's star marker feature this is not necessary in Project Apollo - NASSP:
- Press F4
- Choose "Visual helpers..." in the "Main" window
- Check "Planetarium mode" in the "Visual helpers" window
- Check "Celestial" in the "Markers" box and press the "Config" button nearby
- Select "Apollo AGC navigation stars" in the "Configure celestial markers" window
- Close all the windows
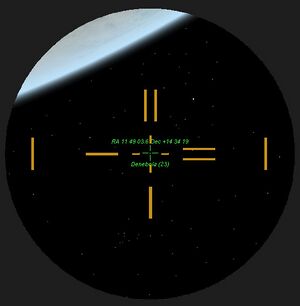
Now the navigation stars are marked with a green cross and labeled with their number and so they can be found very easily.
Sextant and Scanning Telescope

The CSM has two optical instruments, the Sextant (SXT) and the Scanning Telescope (SCT). Both have a panel of it's own in Project Apollo - NASSP. To switch to the Scanning Telescope panel, press <CTRL><DOWN> twice from the main panel. Press <CTRL><LEFT> to go to the Sextant panel from the Scanning Telescope panel. The Scanning Telescope has a fixed field of view of 60°, the Sextant of 10°, so use the Scanning Telescope to coarse align to the star to be marked and use the Sextant to do the actual mark. The following keys are used to operate the Sextant and the Scanning Telescope:
| Key | Usage |
|---|---|
| W | Move up |
| A | Move left |
| S | Move down |
| D | Move right |
| Q | Mark star |
| E | Reject mark (to cancel a previous mark) |
The speed of the shaft and trunnion movement of both the Sextant and the Scanning Telescope can be selected with the CONTROLLER SPEED switch on panel 122.
P52 (REFSMMAT) checklist
Additionally to the original procedureA15_CSMGC_CHECK the checklist below is adapted to the usage of the Sextant and the Scanning Telescope in Orbiter.
| Procedure | Panel | Remarks | |||||||||||||||||||||||||||||
|---|---|---|---|---|---|---|---|---|---|---|---|---|---|---|---|---|---|---|---|---|---|---|---|---|---|---|---|---|---|---|---|
|
|
| |||||||||||||||||||||||||||||
|
|
| |||||||||||||||||||||||||||||
|
|
| |||||||||||||||||||||||||||||
|
| ||||||||||||||||||||||||||||||
If the AGC fails to select two suitable stars, a PROG alarm occurs and the DSKY shows "F 05 09" with error code "00405" (two stars not available) in R1. In this case press RSET, change the spacecraft's attitude to a better position (for example pitch up 90°) and key in "V32E" to return to Star selection and to try again. Otherwise go on with the Mark sequence.
| Procedure | Panel | Remarks | |||||||||||||||||||||||||||||||||||||||||||||||||||||||||||||
|---|---|---|---|---|---|---|---|---|---|---|---|---|---|---|---|---|---|---|---|---|---|---|---|---|---|---|---|---|---|---|---|---|---|---|---|---|---|---|---|---|---|---|---|---|---|---|---|---|---|---|---|---|---|---|---|---|---|---|---|---|---|---|---|
|
|
Use the keys explained above.
Reject mark ("E" key) and mark again,
| |||||||||||||||||||||||||||||||||||||||||||||||||||||||||||||
When the first mark sequence is completed, a second star sighting is to be done, so the mark sequence is repeated with another star. After the second mark sequence go on with the IMU orientation adjustment.
| Procedure | Panel | Remarks | ||||||||||||||||||||
|---|---|---|---|---|---|---|---|---|---|---|---|---|---|---|---|---|---|---|---|---|---|---|
|
|
| ||||||||||||||||||||
|
|
| ||||||||||||||||||||
|
|
| ||||||||||||||||||||
Now the IMU orientation with respect to the Apollo Basic Reference Coordinate System matches the REFSMMAT stored in the AGC again.
<biblio force=false>
#References
</biblio>