Panel Controls and Displays (CSM): Difference between revisions
imported>Tschachim No edit summary |
imported>Tschachim No edit summary |
||
| Line 2: | Line 2: | ||
== Panel Documentation == | == Panel Documentation == | ||
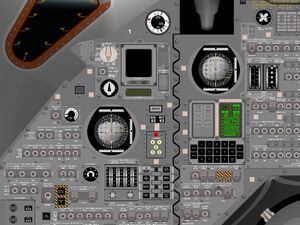
[[Image:CSM_main_panel.jpg|thumb|right|CSM main control panel]] | |||
The CSM panels have a few hundred controls and displays. In the past we tried to provide reference documentation of each single switch and each gauge. The latest version of the [[CSM_panel_reference|old CSM panel reference]] demonstrates this approach. But the more the panels get realistic it turned out in just copying the original NASA documentation, mainly of the Apollo Operations Handbook<cite>AOH</cite> controls & displays section. Of course a comprehensive guide of all the switches including in depth explanations and screenshots would be great, but because of the tremendous work to do and maintain such a documentation something like this is not available. | |||
== Apollo Operations Handbook == | == Apollo Operations Handbook == | ||
'''Article outline''': | '''Article outline''': | ||
| Line 11: | Line 18: | ||
* Explain panel locator and move the remaining stuff of the [http://nassp.sourceforge.net/user/panelreference.html old site] | * Explain panel locator and move the remaining stuff of the [http://nassp.sourceforge.net/user/panelreference.html old site] | ||
'''Abbreviations''' | '''Abbreviations''' | ||
Revision as of 12:56, 22 October 2006
Most of the CSM control panels are simulated as completely authentic, almost photo realistic 2D panels. Many of the controls and displays are not only "switchable" but are really doing what the original switches did. So you can operate the spacecraft as the real astronauts did.
Panel Documentation

The CSM panels have a few hundred controls and displays. In the past we tried to provide reference documentation of each single switch and each gauge. The latest version of the old CSM panel reference demonstrates this approach. But the more the panels get realistic it turned out in just copying the original NASA documentation, mainly of the Apollo Operations HandbookAOH controls & displays section. Of course a comprehensive guide of all the switches including in depth explanations and screenshots would be great, but because of the tremendous work to do and maintain such a documentation something like this is not available.
Apollo Operations Handbook
Article outline:
- Panel description and screenshot
- No extra panel reference like the old CSM panel reference
- Use the AOHAOH controls & displays section instead
- Explain panel locator and move the remaining stuff of the old site
Abbreviations
Also the following abbreviations are used:
lt - light
sw - switch
sel - rotary type switch
cb - circuit braker
tb - talkback indicator
bp - "barber pole" (striped line indication of a talkback indicator)
vlv - valve
ind - indicator
pb - pushbutton
cont - potentiometer or rheostat
tw - thumbwheel
Additionally to use the DSKY the following abbreviations are used: V is short for VERB, N is short for NOUN, and E is short for ENTR.
<biblio force=false>
</biblio>