Launchpad Configuration Options: Difference between revisions
imported>Tschachim (new settings) |
imported>Tschachim m (links) |
||
| (One intermediate revision by the same user not shown) | |||
| Line 9: | Line 9: | ||
=== Mesh resolution === | === Mesh resolution === | ||
Setting to "Low resolution" will switch to low resolution Saturn | Setting to "Low resolution" will switch to low resolution [[Saturn IB]] and [[Saturn V]] meshes. This can substantially increase frame-rates on slow machines. | ||
=== CSM main panel === | === CSM main panel === | ||
| Line 29: | Line 29: | ||
[[Image:ProjectApolloConfigurator_Controls.jpg|thumb|right|The Controls tab of the Launchpad Options.]] | [[Image:ProjectApolloConfigurator_Controls.jpg|thumb|right|The Controls tab of the Launchpad Options.]] | ||
In ''Quickstart Mode'' the [[CSM RCS]] and the [[SPS]] engine are controlled by Orbiter directly as for example in the Delta-glider including the navmodes (killrot etc.), attitude and engine control by MFDs etc. While this is unrealistic as no electricity is needed and the thrusters are throttable etc., this is intended for new users to get familiar with the Apollo spacecraft without to have to care about the real spacecraft systems like the [[RHC]], the [[THC]] or realistic attitude control. So normally the settings here aren't used in ''Quickstart Mode'', but optionally Orbiter attitude control can be disabled, see next section. | |||
In '' | In ''Virtual AGC Mode'' Orbiter attitude and engine control is disabled, the spacecraft needs to be controlled like the real one by using the [[CSM panels|panel]], the [[Rotation Hand Controller]] (RHC) and the [[Translation Hand Controller]] (THC) controlling the [[PGNCS]] or [[SCS]]. The historic Apollo spacecraft had two "joysticks", the [[RHC]] and the [[THC]], to allow simultaneous control of the vessel's rotational and translational manoevers. Because Orbiter only allows one joystick, Project Apollo - NASSP has it's own joystick configuration and allows the use of two joysticks simultaneously. | ||
=== Suggested Joystick Configurations === | |||
==== Configuration without joysticks ==== | |||
Without any joystick, Orbiter's linear and rotational attitude controls (keyboard, joystick etc. as you have configured it) are used as input for the RHC and THC depending on Orbiter's attitude control mode, ROT or LIN. So the spacecraft is controlled realistically as the Orbiter controls don't control the thrusters directly, but the control gains are redirected to the correct spacecraft systems. | Without any joystick, Orbiter's linear and rotational attitude controls (keyboard, joystick etc. as you have configured it) are used as input for the RHC and THC depending on Orbiter's attitude control mode, ROT or LIN. So the spacecraft is controlled realistically as the Orbiter controls don't control the thrusters directly, but the control gains are redirected to the correct spacecraft systems. | ||
==== Configuration with one joystick ==== | |||
There are two suggested possibilities how the spacecraft can be controlled with one joystick: Either the joystick is used as RHC while the THC is controlled simultaneously by Orbiter's linear attitude control with the keyboard or the joystick is used either as RHC or as THC depending on Orbiter's attitude control mode, ROT or LIN. | There are two suggested possibilities how the spacecraft can be controlled with one joystick: Either the joystick is used as RHC while the THC is controlled simultaneously by Orbiter's linear attitude control with the keyboard or the joystick is used either as RHC or as THC depending on Orbiter's attitude control mode, ROT or LIN. | ||
| Line 49: | Line 47: | ||
In order to use the joystick either as RHC or as THC, activate the RHC as explained below and check the "If only the RHC..." checkbox below and don't activate the THC. Then this joystick is used either as RHC or as THC depending on Orbiter's attitude control mode, ROT or LIN. You can assign a joystick button as ROT/LIN toggle. | In order to use the joystick either as RHC or as THC, activate the RHC as explained below and check the "If only the RHC..." checkbox below and don't activate the THC. Then this joystick is used either as RHC or as THC depending on Orbiter's attitude control mode, ROT or LIN. You can assign a joystick button as ROT/LIN toggle. | ||
==== Configuration with two joysticks ==== | |||
Two joysticks are the optimal configuration, activate both the RHC and the THC as explained below. If only one joystick has a [[w:joystick|POV "Hat" Switch]], it is suggested to use this joystick as THC, see the [[THC]] article. | Two joysticks are the optimal configuration, activate both the RHC and the THC as explained below. If only one joystick has a [[w:joystick|POV "Hat" Switch]], it is suggested to use this joystick as THC, see the [[THC]] article. | ||
=== RHC Configuration === | |||
{{Attention | message=Orbiter's joystick control must be '''<Disabled>''' in order to use the Project Apollo - NASSP joystick control.}} | {{Attention | message=Orbiter's joystick control must be '''<Disabled>''' in order to use the Project Apollo - NASSP joystick control.}} | ||
Check "RHC enabled" and enter a joystick ID to activate a joystick as [[Rotation Hand Controller]]. Joystick IDs start with 0, so if there's only one joystick the ID is 0. | Check "RHC enabled" and enter a joystick ID to activate a joystick as [[Rotation Hand Controller]]. Joystick IDs start with 0, so if there's only one joystick the ID is 0. | ||
| Line 62: | Line 59: | ||
Activate the checkbox below to use this joystick either as RHC or as THC depending on Orbiter's attitude control mode, ROT or LIN. Additionally to the usual Orbiter controls to change the attitude control mode a joystick button can be configured for that, too. Enter a button ID to active a joystick button as RHC/THC toggle. Joystick button IDs start with 0. | Activate the checkbox below to use this joystick either as RHC or as THC depending on Orbiter's attitude control mode, ROT or LIN. Additionally to the usual Orbiter controls to change the attitude control mode a joystick button can be configured for that, too. Enter a button ID to active a joystick button as RHC/THC toggle. Joystick button IDs start with 0. | ||
=== THC Configuration === | |||
In order to configure a second joystick as [[Translation Hand Controller]], check "THC enabled" and enter a joystick ID. Joystick IDs start with 0. Computer joystick axes don't match the axes of the real THC, see the [[THC]] article on how to use the joystick as THC. | In order to configure a second joystick as [[Translation Hand Controller]], check "THC enabled" and enter a joystick ID. Joystick IDs start with 0. Computer joystick axes don't match the axes of the real THC, see the [[THC]] article on how to use the joystick as THC. | ||
| Line 74: | Line 71: | ||
=== Checklists === | === Checklists === | ||
At certain points during a mission, for example during prelaunch or when separation events are triggered by pressing the "J" key, the corresponding checklists are executed automatically, so the user need not to take care about the spacecraft and its systems. Enable this setting to execute the checklists manually to learn how the spacecraft is used as in ''Virtual AGC Mode''. | At certain points during a mission, for example during prelaunch or when separation events are triggered by pressing the "J" key, the corresponding checklists are executed automatically, so the user need not to take care about the spacecraft and its systems. Enable this setting to execute the checklists manually in order to learn how the spacecraft is used as in ''Virtual AGC Mode''. | ||
=== Orbiter's attitude control === | === Orbiter's attitude control === | ||
| Line 82: | Line 79: | ||
=== Panels === | === Panels === | ||
In ''Quickstart Mode'' the backup sequencer switches are illuminated when the corresponding | In ''Quickstart Mode'' the backup sequencer switches are illuminated when the corresponding events occur, for example CSM/LV separartion. This unrealistic behaviour can be disabled with this setting. | ||
[[Category:Scenario configuration]] | [[Category:Scenario configuration]] | ||
Latest revision as of 16:10, 30 July 2008
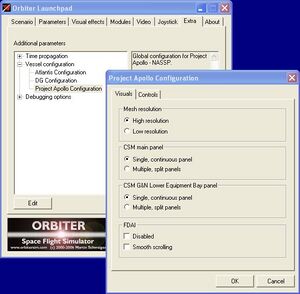
The global configuration options of Project Apollo - NASSP like the mesh resolution or the joystick configuration can be changed by using the Project Apollo Launchpad Configurator. In order to open the configurator, start Orbiter, switch to the Extra tab of the Orbiter launchpad, double-click Vessel configuration and then double-click Project Apollo Configuration.
The following options are available at the moment:
Visuals

Mesh resolution
Setting to "Low resolution" will switch to low resolution Saturn IB and Saturn V meshes. This can substantially increase frame-rates on slow machines.
CSM main panel
The CSM 2D cockpit features fully functional control panels. Especially the CSM main panel is very large, which can cause frame rate problems with some graphic adapters. To address this problem or if you just want to have a split main panel instead of scrolling a huge single panel, switch to "Multiple, spit panels".
CSM G&N Lower Equipment Bay panel
The lower equipment bay panel has evolved to be larger over the course of development. This option allows you to split the lower bay panel into three slightly overlapping lower panels. The Optics, MFDs, and DSKY will remain in the center panel.
FDAI
The FDAI is a kind of "artificial horizon", which is implemented by using the OpenGL interface. That can cause problems or even crashes with some graphic adapters. To completely disable the FDAIs in this case, check the "Disabled" check box.
To maintain a proper frame rate even with slower graphic adapters the FDAIs are redrawn very carefully. If you have a powerful graphic adapter you can switch to "smooth scrolling", then the FDAIs are updated every timestep, which should provide a smoother scrolling.
Controls

In Quickstart Mode the CSM RCS and the SPS engine are controlled by Orbiter directly as for example in the Delta-glider including the navmodes (killrot etc.), attitude and engine control by MFDs etc. While this is unrealistic as no electricity is needed and the thrusters are throttable etc., this is intended for new users to get familiar with the Apollo spacecraft without to have to care about the real spacecraft systems like the RHC, the THC or realistic attitude control. So normally the settings here aren't used in Quickstart Mode, but optionally Orbiter attitude control can be disabled, see next section.
In Virtual AGC Mode Orbiter attitude and engine control is disabled, the spacecraft needs to be controlled like the real one by using the panel, the Rotation Hand Controller (RHC) and the Translation Hand Controller (THC) controlling the PGNCS or SCS. The historic Apollo spacecraft had two "joysticks", the RHC and the THC, to allow simultaneous control of the vessel's rotational and translational manoevers. Because Orbiter only allows one joystick, Project Apollo - NASSP has it's own joystick configuration and allows the use of two joysticks simultaneously.
Suggested Joystick Configurations
Configuration without joysticks
Without any joystick, Orbiter's linear and rotational attitude controls (keyboard, joystick etc. as you have configured it) are used as input for the RHC and THC depending on Orbiter's attitude control mode, ROT or LIN. So the spacecraft is controlled realistically as the Orbiter controls don't control the thrusters directly, but the control gains are redirected to the correct spacecraft systems.
Configuration with one joystick
There are two suggested possibilities how the spacecraft can be controlled with one joystick: Either the joystick is used as RHC while the THC is controlled simultaneously by Orbiter's linear attitude control with the keyboard or the joystick is used either as RHC or as THC depending on Orbiter's attitude control mode, ROT or LIN.
In order to use the joystick as RHC, activate the RHC as explained below, but don't check the "If only the RHC..." checkbox below and don't activate the THC. Then in game switch Orbiter's attitude control mode to LIN ("translation"). Now you control the RHC with the joystick and the THC with the numeric keypad, a good alternative to two joysticks.
In order to use the joystick either as RHC or as THC, activate the RHC as explained below and check the "If only the RHC..." checkbox below and don't activate the THC. Then this joystick is used either as RHC or as THC depending on Orbiter's attitude control mode, ROT or LIN. You can assign a joystick button as ROT/LIN toggle.
Configuration with two joysticks
Two joysticks are the optimal configuration, activate both the RHC and the THC as explained below. If only one joystick has a POV "Hat" Switch, it is suggested to use this joystick as THC, see the THC article.
RHC Configuration
| ||
| Orbiter's joystick control must be <Disabled> in order to use the Project Apollo - NASSP joystick control. |
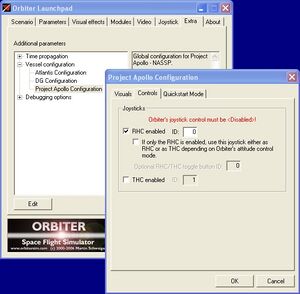
Check "RHC enabled" and enter a joystick ID to activate a joystick as Rotation Hand Controller. Joystick IDs start with 0, so if there's only one joystick the ID is 0.
Activate the checkbox below to use this joystick either as RHC or as THC depending on Orbiter's attitude control mode, ROT or LIN. Additionally to the usual Orbiter controls to change the attitude control mode a joystick button can be configured for that, too. Enter a button ID to active a joystick button as RHC/THC toggle. Joystick button IDs start with 0.
THC Configuration
In order to configure a second joystick as Translation Hand Controller, check "THC enabled" and enter a joystick ID. Joystick IDs start with 0. Computer joystick axes don't match the axes of the real THC, see the THC article on how to use the joystick as THC.
Quickstart Mode

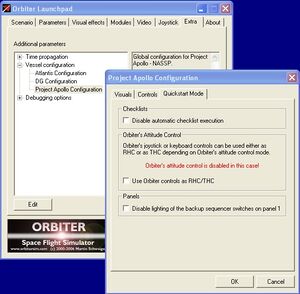
In Quickstart Mode there are several features and differences to the historic spacecraft to make things easier for new users. Some of these features can be disabled with the following settings. Of course, the settings apply in Quickstart Mode only.
Checklists
At certain points during a mission, for example during prelaunch or when separation events are triggered by pressing the "J" key, the corresponding checklists are executed automatically, so the user need not to take care about the spacecraft and its systems. Enable this setting to execute the checklists manually in order to learn how the spacecraft is used as in Virtual AGC Mode.
Orbiter's attitude control
In Quickstart Mode Orbiter controls the RCS thrusters directly in a unrealistic way, no electricity is needed, the thrusters are throttable and there are these navmodes (killrot etc.). To learn realistic spacecraft control as in Virtual AGC Mode, Orbiter's attitude control can be disabled with this setting and the Orbiter controls (keyboard, joystick etc. as you have configured it) are used as input for either as RHC or as THC depending on Orbiter's attitude control mode, ROT or LIN. See the "Controls" section above about how to configure joysticks properly in this case.
Panels
In Quickstart Mode the backup sequencer switches are illuminated when the corresponding events occur, for example CSM/LV separartion. This unrealistic behaviour can be disabled with this setting.